Shielding Smart Meters

Smart meters are becoming more common in today’s world and can be found on most if not all of your utilities (water, gas, and electric).  They have evolved because in short, people demanded them.  Customers don’t want to pay more for any of their utilities, but they want the companies to fix problems as soon as they happen.   Customers also want to know how they can limit their costs and so monitoring usage is necessary.  This used to be done with PLC (powerline communications), but this software has become dated.  This means upgrades and maintenance which costs more money.  The increased use of wireless signals makes smart meters more cost effective for companies and because of that it means a little bit cheaper bill for customers.  Many customers don’t even realize smart meters are there.

This article is for the people that do have issues caused by RF signals and walks you though how to handle them.  When dealing with smart meters it is important to understand which kind you have and how often it transmits a signal.   For meters that only transmit a signal once a day or less, I don’t bother with shielding, but many smart meters will transmit every 6 seconds.  These are the meters I look to shield.

Once you have located the meter and determined the interval of transmission, the next thing to do is shield it.  With gas and water meters, this is quite simple.  All you will need to do is wrap aluminium foil around the meter.  I normally do this 3-4 times or based on the reading on the RF meter that I am using.  When completed it looks something like the picture below.

water meter

With this shielded, the local water utility personnel can’t get a reading from the street, so when they come to take their readings, I remove the foil and then reapply it.  They take a reading once every three months.  Lately they have been calling when they are in the area, and I leave it un-shielded for a day and then re-shield for the three months they are not monitoring it.

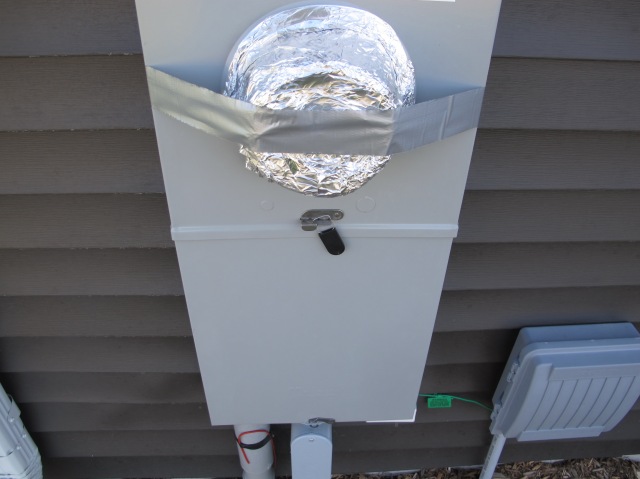
Smart meters that are located on the electrical panel are a bit harder to shield.  Really when shielding these, it is a two step process.  The first step is to shield the meter itself like in the picture below.  Again, I just used aluminum foil and duct tape.
smart meter

I formed the foil around the glass part of the meter 4-5 layers thick.  This will decrease the signal, but it will not completely block the signal.  The utility likely will not be able to pick up the signal.  The back side of the utility box will also act as a shield since it is made of metal, however you still should account for reflection.   Shielding the rest of the signal that is coming off the meter and going into the house is necessary.  It is also important to have the inside wall shielded so if the shield on the outside is taken off, or falls off, you will still have some shielding in place.  To do this you will need to shield the wall on the back side of the meter.

Locate the inside room in your house where the meter attaches to the wall.  For our home, it is the where the box is in the photo below.  beforewallPNG

There are many types of shielding products that will work for reducing/blocking RF signals caused by smart meters.  The one I chose was a Mylar blanket.  You can find these in the camping section of a sporting goods store.  A 4 x 6 ft blanket will run you less than $5 per blanket.  These blankets are thin so you may need more than one.

Using just double stick tape on the back side of the blankets, I adhered them to the wall.  I had them all overlap where the box was located on the wall in the picture below.  This will do a couple of things.  One, it will add more shielding where the signal will be strongest.  Second, it will reduce the signal that would otherwise go into my son’s room adjacent to this room.
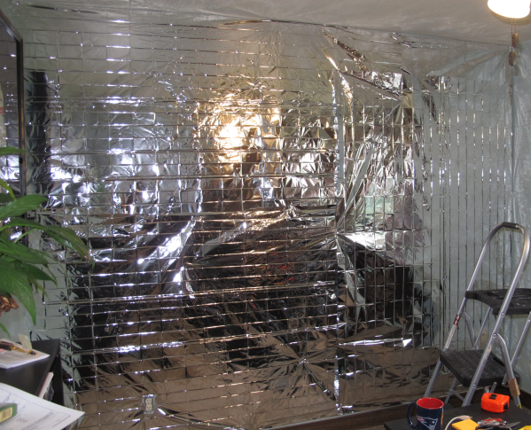
wall with foil.PNG

At this point, you could leave the wall because it is shielded, however it is not aesthetically pleasing to look at.  This is where doing an accent wall comes into play.  We used reclaimed redwood and the finished product is in the picture below.

finished

It is important to note that with an electrical box there are 2 issues.  One is the RF signal that comes form the potential smart meter (which we just shielded), but the other is a magnetic field  that would be in the area of the box in the picture above.  Since your electrical panel is located directly below this, there is a a magnetic field generated from that.  There is shielding that you can use for magnetic fields, however it is much cheaper to move away from the problem area.  YOU SHOULD NEVER PLACE A BED OF ANY KIND IN AN AREA WITH A MAGNETIC FIELD.  This is especially important for small children and infants.  You are looking at placing any type of sleeping area at least 6 ft from the source, because at that distance the magnetic field will be greatly reduced (to the point of the ambient field in most cases).  In our house, shielding the RF signal was enough because this room is used as an office.  We place ourselves out of the magnetic field as far as possible.  In the future, we could use this as bedroom, but would just need to be mindful of where the bed was placed.

The total cost for this DIY project was around $450.  This doesn’t include the tools needed to do the project, only the materials.  The breakdown of materials was about $20 for the shielding material (used 4 blankets) and the rest was redwood shiplap.

Shielding

When do you buy shielding?  Does shielding work?  Should I buy shielding for my home?  These are questions that come up a lot.  Many people that are worried about the effects of being exposed to EMF’s have bought some type of shielding.  There are many items that will shield you from some aspects of EMF’s.  Today we are going to talk about a few items that block microwave frequencies.

How does shielding work?

Most of these items are made in a similar way.  You take a piece of cloth and then you line it with a conductive metal.  Many times this metal is silver.  The lines of thread are then woven together and the result is a basic Faraday cage that mitigates microwave frequencies.   These items are good at blocking these frequencies, but this is not the whole picture.

When should you get shielding or where should you have shielding?

If you are in an area that has a lot of wireless activity, or find yourself next to towers that you can can’t do anything about, then this is when you should consider shielding.  The most cost-effective place to shield is your bed.  This is for a few very important reasons:

  • You are in the same spot for many hours a night
  • Night time is when your body heals
  • A good nights sleep is an important part of health

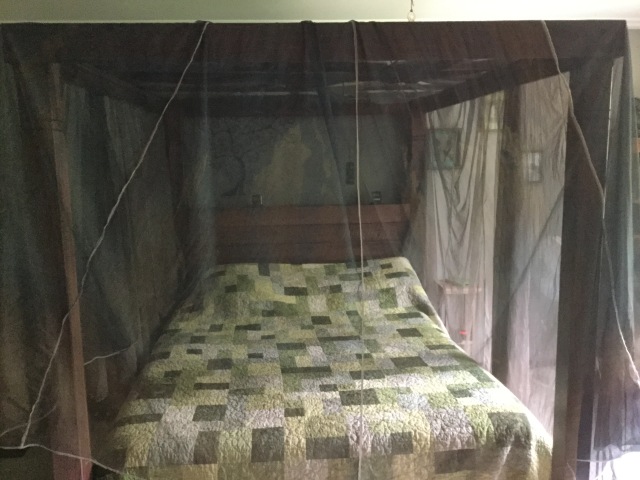
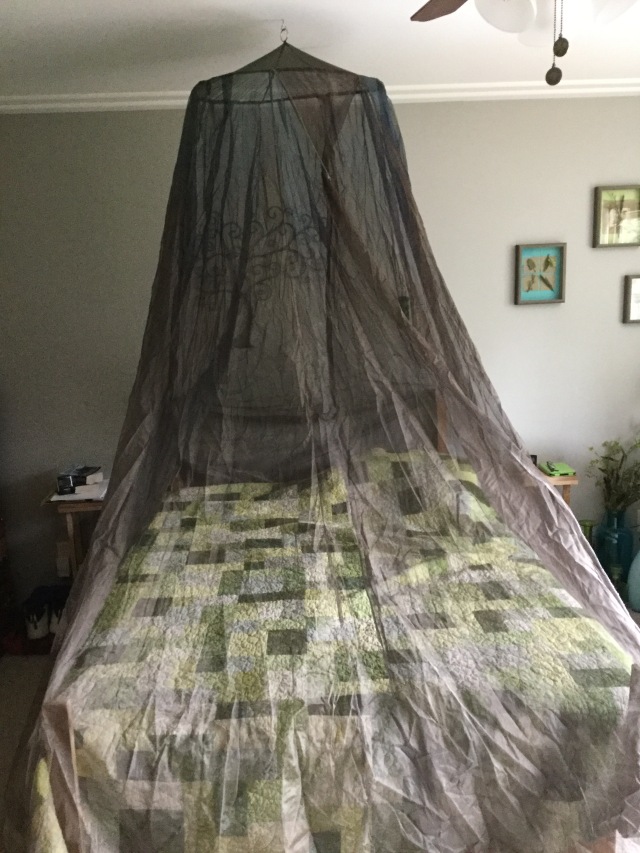
We live in an area that has a lot of wireless activity and because of my sensitivities I purchased a canopy as pictured below.    This is the set up that we were using for a long time.  For the record, this is wrong.  We were doing this wrong because we were only looking at one side of the problem.  I will explain.

WRONG SET-UP:

IMG_0055

With this setup, many times during the night, we found different parts of our body (feet, hands, arms, or head) touching the canopy.  This is where the problem is.  Items that block microwave frequencies will do so, and the higher concentration the more it will block.  This is where we failed.  By touching the canopy that is blocking wireless frequencies, it gives that energy someplace else to go, which is into your body.  This is also referred to as contact current.  By mitigating one problem we created another problem.

Key point in shielding: You should not allow the shielding to touch your body.  If you are inside of the shield you are fine. 

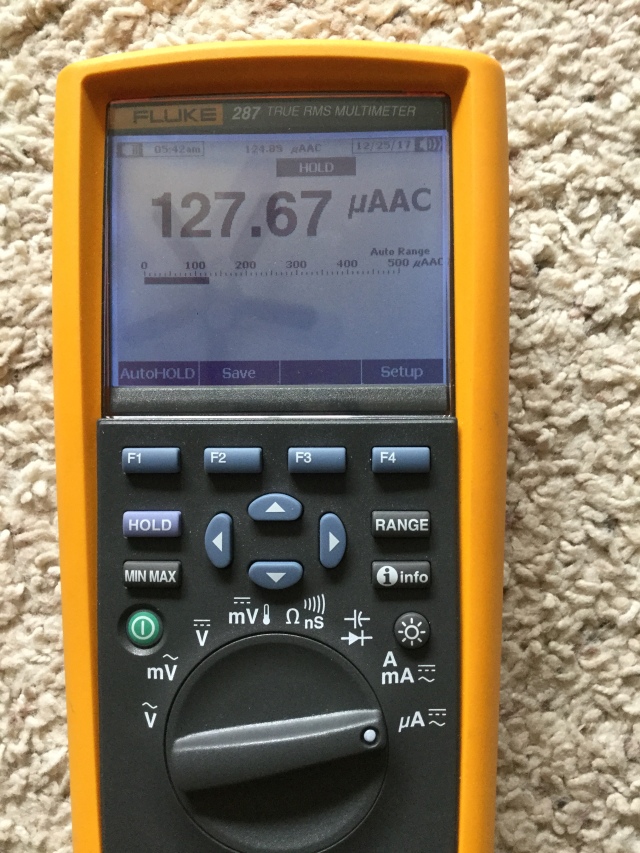
In our instance we had contact current passing through as shown by the picture below.  Anything above 18 microamps is considered bad and harmful as can be read here.  At 127 microamps you need to do something.  The question is –which is less bad? To be exposed to wireless frequencies or 127 microamps of contact current?   I honestly don’t know.  So I took down the canopy to try and find out which is worse for me by judging how I slept at night.   Over time I noticed that my quality of sleep started to suffer.  I was not as rested.  I was less patient.  I needed to try something different.  I had to go back to the drawing board.

IMG_0056

What we needed was a way to create a defined space for the netting that we would not come in contact with while we slept.  The solution was a four post bed made of wood (not metal because metal is conductive).

CORRECT SET-UP:

IMG_0059

Now with our bed we are able to set up our netting without coming in contact with it for long periods of time.  This has led to better sleeping for both my wife and I.   This was something special that needed to be made and we couldn’t have done this without Nordic Custom Woodworking (Eau Claire, WI).  Now we not only have a great looking bed, but we also have something that supports our netting in a functional way.  This in turn has provided us with better sleeping and most importantly we are not coming into contact with the netting in our sleep.

The other option to deal with shielding is to have it grounded.  However you MUST keep in mind that in most cases ground is not zero.  There is contact current there and so by attaching yourself to ground, you can increase your contact current.  This defeats the purpose of grounding.

Here are some key things that you should take away from this:

  • If you are going to shield from wireless that you cannot control, the most cost-effective method is to shield your bed.
  • By grounding the shielding, you could could increase the contact current present
  • Do not use any shielding that will touch your skin because you will increase your contact current.  This includes items like shielding blankets/sheets, shirts, hats, or any other clothing. If you use a canopy, make sure you do not come in contact with it in your sleep.
  • Bed frames should be made of wood and not metal
  • Metal is conductive and is an antenna for wireless so wear as little metal as possible. This would also include excessive jewelry and metal in under-wire bras


Magnetic Fields and Miscarriages

Recently there was a research paper that found higher rates of miscarriages based on an individual’s exposure to magnetic fields which you may read here.   In this paper they found that you have an almost 3 times (2.72) higher chance of a miscarriage by being exposed to a magnetic field of more 2.5 mG for more than 14 minutes.  Another paper that had similar findings found that women that were exposed to a field of over 16 mG had a higher chance of having a miscarriage, which can be read here.

Fields of this magnitude are not difficult to find in a common home.  Below lists some electrical items that can create fields of 2.5 mG, or items that can create fields larger than 18 mG.  Many of these items are commonly used for greater than 14 minutes at close proximity.

Electric Blankets

Electric Space Heaters

Hair Dryer

Electric Toothbrush

Electric Razors

Massage Chairs

Electric Saunas

Motorized Beds

Alarm Clock Radios

Electrical Utility Panels

Electric Cook-tops

Convection Oven

Conventional Oven

Refrigerators

Plasma TV’s

Small Fans

Kitchen Appliances

Electric Power Tools

Computer Desktops

Wiring Errors in the Home

Just because you have something on this list doesn’t mean you have to get rid of it.  Many of these items you can still use by simply creating a safe distance.  The farther away you are the less the field will be.  In the case of wiring errors, these you can fix.


What is Dirty Electricity?

When we talk about clean power we are referring to how perfect the Sine Wave is.  How much distortion is being caused by harmonics?  What the total harmonic distortion (THD) is.  The IEEE (Institute for Electrical and Electronic Engineers) has standards for THD which can be found in the IEEE 519.  The basic, short version is that standard power that is supplied to your home will have no more than 5% harmonic voltage distortion with the largest single harmonic being no more than 3% of the fundamental voltage.   If you are shopping for inverter generators this is sometimes mentioned as a selling point if they have really low THD.  Inverter generators have other issues as described in this blog post.  What the Microsurge meter does is quantifies the THD in your home by analyzing what frequencies are present in the THD.  If you have an oscilloscope reading, then you have a much better break-down of which frequencies you are dealing with that make your THD.

On this page you will be find many before and after pictures of graphs that show a reduction in frequencies on the building wires after installing Stetzerizer Filters.  The frequencies that are reduced or eliminated are the ones that range from 4 kHz to 100 kHz (which the filters are designed to filter because they are biologically active frequencies).   People who are electronically sensitive will react to this frequency range on a building’s wires. You can find these frequencies in almost every building in America; the only exception being those buildings that have filters plugged in.  These frequencies are created primarily by the electronics that we have which include but are not limited to: switch mode power supplies, computers, certain light bulbs, variable frequency drives,  game consoles, Blue Ray players, and generally anything that uses a non-linear load.  Non-linear loads are pretty much found in all the electronics and ‘green items’  that you have in your home today.

The first step in dealing with any problem is getting a measurement of how bad it is.  Measure first to find out what your levels are.  To do this, you will need a device like the Microsurge Meter.  The higher the number on this device, the worse it is.   To reduce this number you simply plug in filters where you need them (you will not need one in all of your outlets).  To order a Microsurge Filter and filters with instructions to fix your home, click on this link.


LED Bulbs

IMG_0004

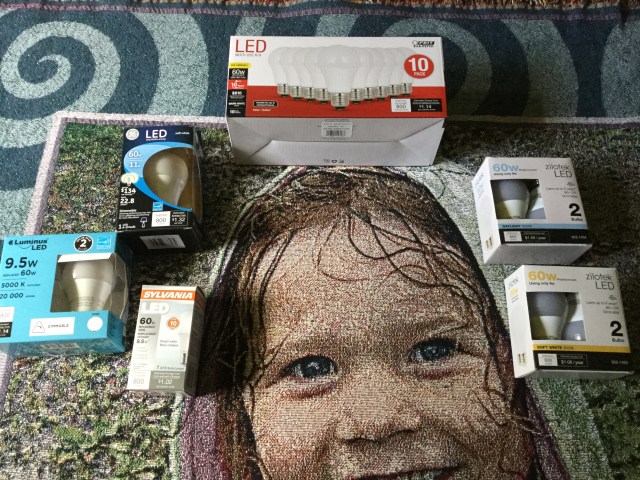
Recently I found myself needing to buy some LED bulbs. All of the bulbs, around my light bulb, were bought at Menards.  You should be able to find these at really any home improvement store.  These are the only ones that I kept. When I was testing to find the ‘good’ LED know that I ended up returning about 2 times the amount of bulbs that I kept.  If you are going to get any of these bulbs double check to make sure they are good.  Also make sure they are EXACTLY the same bulb as the one in the picture.

Like I have said before you will need to test LED bulbs to see if they produce dirty electricity.  The easiest way to do this is with a Microsurge meter, which can be bought here and instructions can be found here.

The Importance of a Symbol

In Owen-Withee there is a garden with my daughter’s name, Kyanna, on it.  On the surface it is easy to recall a 7 year old girl that died of brain cancer, simply because it has her name.  To a point a you would be right in thinking that.  It is a remembrance in a way, but it also a symbol of so much more that you don’t see and is lost.

It is not hard to find the bad in life.  It would seem that by looking at a news feed or even your Facebook feeds that there is bad all over.  Horrible things happening what seems like all the time.   There seems to be an endless supply of this news that we are fed and at least for me after so many years of it, you can get lost in that.   You can start to become more cynical and start to close yourself and may even start to believe all that you read or see in the news, because after all if there was good in the world we would surely hear about it, right?  The good is often overlooked or forgotten.  Finding a symbol of good things is even harder.

For anyone that has received an unfathomable amount of help, it changes you.  It changed me.   When you see people that have no idea who you are and are trying to help for no better reason than that they believe it is right thing to do, that leaves a lasting impression.   You are awed,  humbled, grateful, and can even be meant to feel unworthy of all that has been given to you.  Asking for help is just as hard as receiving it.

When I look at the garden in Owen-Withee I remember my daughter, however more importantly I remember all those that made that possible.  I remember people coming together to make something better, because they felt that a situation was wrong.  I see a symbol of people that care and are trying to make the world a better place.  I see people helping someone else in a time of need.  I see the good in people when I see that garden, and I remember there were many people that made that possible, they are the stars in our night sky.  Simply put, the garden reminds me of the goodness in humanity.  For me, it is a symbol and an embodiment of all things that are good in this world.  I hope when you look upon the garden you will see that as well.

dsc_0060

Flutter Buster Snowshoe Race

dsc_0060

Proceeds from this race will go towards the garden that is in front of the Owen-Withee Schools as well as the Kyanna Joy Darnell Flutter Buster Fund through Eau Claire Community Foundation.  If you are interested in going please fill out and return the form below.  If you are unable to make it for the race you can still make a tax deductible donation to the fund.  To donate click here.

flutter-buster-3


The iPhone 7

http://www.apple.com/legal/rfexposure/iphone9,1/en/

This is a link to Apple’s website that explains the radio frequency exposure, SAR (Specific Absorption Rate) level and steps to take with your iPhone, (these steps can be applied in large part to any phone). This page is referred to in the owners manual, which I am sure everyone has read.  I am going to highlight some key items that you should be made aware of and why.  Anything in bold in this post was just copied and pasted from the linked page above.

Carry iPhone at least 5mm away from your body to ensure exposure levels remain at or below the as-tested levels.

What you should know is that 5 mm is a little less than 1/4 inch, and if you do the conversion is pretty close to 1/5 inch.  This means that if you carry your iPhone in  in your front pocket, your back pocket, your bra, your inside coat pocket, or possibly even your jacket pocket you will be closer than the 5 mm that the manufacturer recommends.  This of course means that you are not using the product as intended and therefore if you were to be harmed by the said product you are going to be hard pressed to receive compensation.   This will also make it hard to call someone since in fact you need to hold the phone.  You might ask ‘how do you carry it then’ and the answer is, when you carry the phone make sure it is in airplane mode.  You will also need to turn off Bluetooth, location, and Wi-Fi (most of these will be turned off when airplane mode is on).  If all of those are turned off, carrying your phone becomes safer.

Cases with metal parts may change the RF performance of the device, including its compliance with RF exposure guidelines, in a manner that has not been tested or certified.

Metal will reflect or block transmission signals.  If your phone is trying to acquire a signal, and you have it in a metal case, it will have to boost its power in order to do this.  This means that you are going to absorb more radio/microwave frequencies.  This of course will mean that you are above the SAR limit that was deemed ‘safe’.  If your iPhone is currently in a metal case, and you plan to be around it, please reread and follow the italics section above.   It would also good to consider a plastic or rubber case, instead of metal.

Here are some other important things to know or consider:

  • The testing for SAR of a phone is done by the manufacturer, not an independent third party, or any government agency.
  • In 2013 the outer ear, called the pinna, was classified by the FCC as an extremity which can be read in this report here.
  • With this classification it means that your outer ear can have the same exposure limits as your hands, wrists, and feet.  Which of course can all be higher than your head.
  • All of the SAR values pertain to an adult, not a teen or child.  Please keep that in mind.

Choosing the Right Light Bulbs

One of the easiest things that you can do in your home to lower your EMF exposure could be to simply change your light bulbs.  There are basically three types of light bulbs: incandescent, fluorescent, and LED.  The question becomes which one should you get and why.

Fluorescent or compact fluorescent (CFL) should be avoided whenever possible.  Here some reasons:

  1. They give off a frequency that will generate current in your body based on proximity. If you are within a few inches of these (which you can find yourself at times if they are in lamps), you will have more than 18 microamps running through your body.  18 microamps is the point at which biological processes relevant to cancer take place as read here..   If you have been to a workshop I have done, I show this.  I also show you this during a home inspection.
  2. The gas in the bulbs contains mercury. Mercury is toxic.  If you were to break the bulb proper cleaning requires what amounts to a hazmat cleanup.
  3. They produce dirty electricity. All the fluorescent bulbs that I have tested do this.  There may be some that don’t, however I have not seen them.  Yes, filters clean this aspect of the bulb, but it is easier to fix a problem if you don’t create one in the first place.
  4. The ballast in the bulb can give off large magnetic fields. This comes more into play when you are in close proximity to the bulb.

Incandescent bulbs (as well as halogen bulbs) are the easiest thing to replace CFL bulbs in your home with.  They do use more power, however the only thing they emit is heat.  No dirty electricity and no frequencies.  This is what I recommend people to start with.  Any brand of incandescent will do.

The last bulb is LED.  LEDs are tricky because some are good but many are not.  You must test them to find out which is which.  You can’t just look at a description, or tell from looking at the box. Most LED bulbs that I have tested will create varying amounts of dirty electricity.  To test this, you will need at least 4 things:

  1. A microsurge meter which you can buy through here
  2. A lamp
  3. A power strip
  4. An outlet that has a low GS reading (which can be measured with the microsurge meter) at least <50 the lower the better. For some this might mean installing filters in your home to achieve this.  The lower the number the better your results will be.

Once you have these the process is simple.  Plug the lamp and microsurge into the powerstrip, (which is plugged into an active outlet) and then read the number on the microsurge meter.  Turn the lamp on, with the bulb you want to test, and if that number is higher than what you started with then the bulb is no good.  If it stays the same, it is good.  Easy as that.  Please note when you turn on the light the microsurge meter will go up and come back down.  This is due to an arc that happens when you make the circuit which is normal.

In summary: Use incandescent bulbs unless you can test LED bulbs, because some LED are ok but many are not.  If you are looking for place to start with LED bulbs email me at darnell@flutterbusters.com and I can get you pointed in the right direction based on your need.  NEVER USE CFLs, and if you have them in your home now, get rid of them. Replace them with incandescent bulbs.

The Puzzle Series Part 1

Over the course of the following posts I am going to do something that I have only done in bits and pieces up until now.  That is, I am going to explain how it is I came to believe that the reason Kyanna developing DIPG was from an over exposure to electromagnetic radiation (EMR) and electromagnetic fields (EMF).  Up until now there have been just bits and pieces and trying to get a clear picture may be difficult.  In order to explain all of this it is going to take more than one post.  I will do my best to explain things in every day terms, because after all if you can’t understand it, what good is trying to teach it? There will be many pieces presented, research papers and papers written by experts in the field, as well as references to other blog posts that I have made over the last few months.  By the end of the series, it is my hope that when you take all of the pieces from these posts and put them together you will see a picture similar to what I see.

There are some important things to keep in mind when reading all of these.  One is all the items that I will be talking about are measurable.  All of the fields and waveforms can be measured and in many cases by more than one kind of instrument.  Electronics and electricity is based on science.  The rules of science either work all of the time or none of the time.  An example of this is gravity.   No matter where you are on the planet if you drop something it will fall, in relation to Laws of Physics.  We have yet to find an exception to the gravity rule.  When science and the working of the human body are involved, results vary all over the place.  The human body and all of its workings is a variable, and honestly a mystery that science has yet to unravel and therefore we can’t fully account for.  One of most unique things about the human body is its ability to repair itself. Everyone’s body does this at different levels and different rates.  The result is that different people have problems with different things or reacting differently to the same stimulus.  For example, I can eat any kind of nut that is brought in front of me.  However, there are many people that if they ate those same nuts will die in a matter of minutes.  Are nuts dangerous to everyone?  No, but they do pose real dangers for some.  For some the results are deadly, and for others they are less serious.  I believe the same can be said for EMF’s.

All of the items that will be posted about in this series will lead back to all of the issues that we found with Kyanna.  All of these issues can be found in Kyanna’s caring bridge page in the post THE WHY?  To recap, the issues that we knew Kyanna had included issues with blood brain permeability, chemical sensitivities, allergens to food, nutritional deficiencies, cell membrane permeability, gastrointestinal issues, heavy metals present in her body, undersized white blood cells, and of course the fact that she had brain cancer.  The following posts explain the simple question, why?  Unfortunately the answer is not so simple.