
Smart meters are becoming more common in today’s world and can be found on most if not all of your utilities (water, gas, and electric). They have evolved because in short, people demanded them. Customers don’t want to pay more for any of their utilities, but they want the companies to fix problems as soon as they happen. Customers also want to know how they can limit their costs and so monitoring usage is necessary. This used to be done with PLC (powerline communications), but this software has become dated. This means upgrades and maintenance which costs more money. The increased use of wireless signals makes smart meters more cost effective for companies and because of that it means a little bit cheaper bill for customers. Many customers don’t even realize smart meters are there.
This article is for the people that do have issues caused by RF signals and walks you though how to handle them. When dealing with smart meters it is important to understand which kind you have and how often it transmits a signal. For meters that only transmit a signal once a day or less, I don’t bother with shielding, but many smart meters will transmit every 6 seconds. These are the meters I look to shield.
Once you have located the meter and determined the interval of transmission, the next thing to do is shield it. With gas and water meters, this is quite simple. All you will need to do is wrap aluminium foil around the meter. I normally do this 3-4 times or based on the reading on the RF meter that I am using. When completed it looks something like the picture below.

With this shielded, the local water utility personnel can’t get a reading from the street, so when they come to take their readings, I remove the foil and then reapply it. They take a reading once every three months. Lately they have been calling when they are in the area, and I leave it un-shielded for a day and then re-shield for the three months they are not monitoring it.
Smart meters that are located on the electrical panel are a bit harder to shield. Really when shielding these, it is a two step process. The first step is to shield the meter itself like in the picture below. Again, I just used aluminum foil and duct tape.
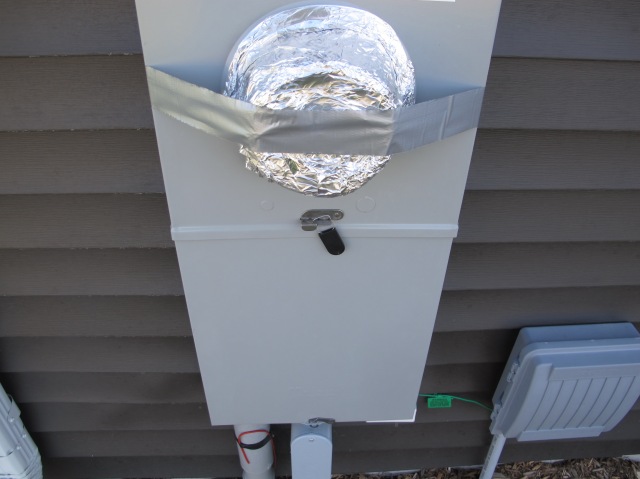
I formed the foil around the glass part of the meter 4-5 layers thick. This will decrease the signal, but it will not completely block the signal. The utility likely will not be able to pick up the signal. The back side of the utility box will also act as a shield since it is made of metal, however you still should account for reflection. Shielding the rest of the signal that is coming off the meter and going into the house is necessary. It is also important to have the inside wall shielded so if the shield on the outside is taken off, or falls off, you will still have some shielding in place. To do this you will need to shield the wall on the back side of the meter.
Locate the inside room in your house where the meter attaches to the wall. For our home, it is the where the box is in the photo below. 
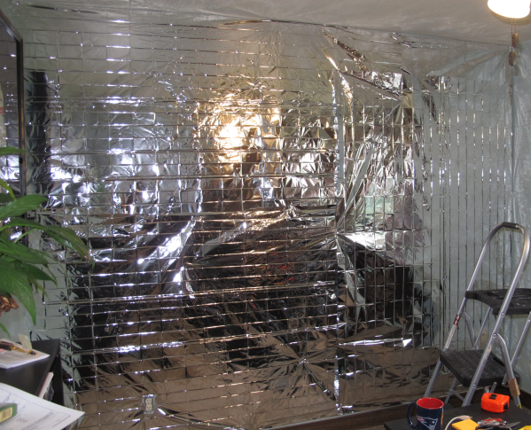
There are many types of shielding products that will work for reducing/blocking RF signals caused by smart meters. The one I chose was a Mylar blanket. You can find these in the camping section of a sporting goods store. A 4 x 6 ft blanket will run you less than $5 per blanket. These blankets are thin so you may need more than one.
Using just double stick tape on the back side of the blankets, I adhered them to the wall. I had them all overlap where the box was located on the wall in the picture below. This will do a couple of things. One, it will add more shielding where the signal will be strongest. Second, it will reduce the signal that would otherwise go into my son’s room adjacent to this room.
At this point, you could leave the wall because it is shielded, however it is not aesthetically pleasing to look at. This is where doing an accent wall comes into play. We used reclaimed redwood and the finished product is in the picture below.

It is important to note that with an electrical box there are 2 issues. One is the RF signal that comes form the potential smart meter (which we just shielded), but the other is a magnetic field that would be in the area of the box in the picture above. Since your electrical panel is located directly below this, there is a a magnetic field generated from that. There is shielding that you can use for magnetic fields, however it is much cheaper to move away from the problem area. YOU SHOULD NEVER PLACE A BED OF ANY KIND IN AN AREA WITH A MAGNETIC FIELD. This is especially important for small children and infants. You are looking at placing any type of sleeping area at least 6 ft from the source, because at that distance the magnetic field will be greatly reduced (to the point of the ambient field in most cases). In our house, shielding the RF signal was enough because this room is used as an office. We place ourselves out of the magnetic field as far as possible. In the future, we could use this as bedroom, but would just need to be mindful of where the bed was placed.
The total cost for this DIY project was around $450. This doesn’t include the tools needed to do the project, only the materials. The breakdown of materials was about $20 for the shielding material (used 4 blankets) and the rest was redwood shiplap.
